Friday, April 28, 2017

SonarQube running as non-root behind a SSL reverse proxy

SonarQube running as non-root behind a SSL reverse proxy

Last time we configured SonarQube to use a MySQL database, see SonarQube with MySQL 5.7.

SonarQube is still running as root (no reason to, it's using a port > 1024). We'll change that and make SonarQube listen on localhost behind a SSL reverse proxy for security reasons as well (company rule, everything has to be transmitted encrypted...).

Let's start with making SonarQube non-root. To do that we create a local group/user named sonar and change some permissions in /opt/sonarqube-6.3.1.

# /opt/sonarqube-6.3.1/bin/solaris-sparc-64/sonar.sh stop
Stopping SonarQube...
Waiting for SonarQube to exit...
Stopped SonarQube.

# groupadd -g 9000 sonar
# useradd -u 9000 -g sonar -d /opt/sonarqube-6.3.1 -s /usr/bin/bash -m sonar
# passwd -N sonar
passwd: password information changed for sonar

# chown -R sonar:sonar /opt/sonarqube-6.3.1/{data,logs,temp} \
  /opt/sonarqube-6.3.1/extensions/{downloads,plugins}

# perl -w -pi -e 's/#(sonar.web.host=).*$/${1}127.0.0.1/' /opt/sonarqube-6.3.1/conf/sonar.properties
# perl -w -pi -e 's@^(PIDDIR=").*$@${1}/opt/sonarqube-6.3.1/logs/"@' /opt/sonarqube-6.3.1/bin/solaris-sparc-64/sonar.sh

# su - sonar

$ /opt/sonarqube-6.3.1/bin/solaris-sparc-64/sonar.sh start
Starting SonarQube...
Started SonarQube.

$ tail -f /opt/sonarqube-6.3.1/logs/sonar.log
...
2017.04.28 10:04:59 INFO  app[][o.s.application.App] SonarQube is up

Running a network reachable service as root only gets you into trouble anyway. ;)

Time to configure a SSL reverse proxy. We'll use Apache 2.2 for this because it's already installed.

Steps for creating a new SSL certificate/key with pktool can be found here How to create a SSL CA/certificate/key with pktool. Done that? Good.

# cp CA.crt /etc/apache2/2.2/server-ca.crt
# cp server.crt /etc/apache2/2.2/
# cp server.key /etc/apache2/2.2/
# chown webservd:webservd /etc/apache2/2.2/server*

# cat << 'EOF' > /etc/apache2/2.2/conf.d/ssl-sonar.conf
SSLRandomSeed startup file:/dev/urandom 512
SSLRandomSeed connect file:/dev/urandom 512

SSLCryptoDevice pkcs11

Listen XXX_REPLACE_WITH_YOUR_FQDN:443

AddType application/x-x509-ca-cert .crt
AddType application/x-pkcs7-crl    .crl

SSLCipherSuite AESGCM:AES
SSLProxyCipherSuite AESGCM:AES
SSLHonorCipherOrder on
SSLProtocol TLSv1.2
SSLProxyProtocol TLSv1.2
SSLSessionCache "shmcb:/var/run/apache2/2.2/ssl_scache(512000)"
SSLSessionCacheTimeout 300
SSLMutex "file:/var/run/apache2/2.2/ssl_mutex"

ProxyRequests off
ProxyPreserveHost on

<VirtualHost _default_:443>
  ServerName XXX_REPLACE_WITH_YOUR_FQDN
  ServerAdmin webservd@XXX_REPLACE_WITH_YOUR_FQDN

  SSLEngine on
  SSLCompression off
  SSLSessionTickets off
  SSLCertificateFile "/etc/apache2/2.2/server.crt"
  SSLCertificateKeyFile "/etc/apache2/2.2/server.key"
  SSLCertificateChainFile "/etc/apache2/2.2/server-ca.crt"

  Header always set Strict-Transport-Security "max-age=15768000"

  ProxyPass / http://127.0.0.1:9000/
  ProxyPassReverse / https://XXX_REPLACE_WITH_YOUR_FQDN/

  CustomLog "/var/apache2/2.2/logs/ssl_request_log" \
          "%t %h %{SSL_PROTOCOL}x %{SSL_CIPHER}x \"%r\" %b"
</VirtualHost>
EOF

# /usr/apache2/2.2/bin/apachectl -t
Syntax OK

# svcadm enable svc:/network/http:apache22

Our SonarQube instance is now running as non-root and is reachable via https only.

# tail -f /var/apache2/2.2/logs/ssl_request_log
[28/Apr/2017:10:47:03 +0200] x.x.x.x TLSv1.2 AES256-GCM-SHA384 "GET / HTTP/1.1" 480
[28/Apr/2017:10:47:03 +0200] x.x.x.x TLSv1.2 AES256-GCM-SHA384 "GET /css/sonar.175ebec8.css HTTP/1.1" 36489
...

Compliance? Check!

Links

Thursday, April 27, 2017

nginx on Solaris 11.3 SRU 19 with EC crypto and HTTP/2 support

nginx on Solaris 11.3 SRU 19 with EC crypto and HTTP/2 support

Solaris 11.3 SRU 19 came out last week and the Bugs Fixed list had the following highlight.

23058111 Enable Elliptic Curve Cryptography in OpenSSL

Niiiice. Let's build nginx with HTTP/2 support. See How to build software on Solaris 11/SPARC for default compiler flags.

# pkg install --accept --no-backup-be developer/build/gnu-make developer/developerstudio-125/cc system/xopen/xcu6
...
           Packages to install: 15
...
$ wget https://nginx.org/download/nginx-1.13.0.tar.gz
$ gzcat nginx-1.13.0.tar.gz | pax -rf -
$ cd nginx-1.13.0
$ PATH=$(getconf PATH) ./configure \
  --prefix=/opt/local --user=webservd --group=webservd \
  --with-cc-opt="-xO4 -xarch=sparcvis2 -Qoption cg -xregs=no%appl -W2,-xwrap_int -xc99=all -xmemalign=16s -mt \
    -KPIC -DPIC" \
  --with-ld-opt="-zaslr=enable -znxstack=enable -znxheap=enable \
    -M /usr/lib/ld/map.noexstk -M /usr/lib/ld/map.noexbss -M /usr/lib/ld/map.pagealign \
    -Bdirect -zignore -zstrip-class=comment -ztype=pie" \
  --with-cpu-opt=sparc64 --with-threads --with-http_ssl_module --with-http_v2_module
...
Configuration summary
  + using threads
  + using system PCRE library
  + using system OpenSSL library
  + using system zlib library

$ perl -w -pi -e 's/-fast -xipo //; s/-g //' objs/Makefile

$ PATH=$(getconf PATH) gmake
...

# gmake install
...

Make the following changes to /opt/local/conf/nginx.conf.

# cat << 'EOF' > /opt/local/conf/nginx.conf
worker_processes  2;

events {
    worker_connections  1024;
    accept_mutex off;
    #use eventport;
}

http {
    include       mime.types;
    default_type  application/octet-stream;

    sendfile on;
    tcp_nopush on;
    gzip on;
    gzip_types application/json application/x-javascript application/xml application/xml+rss
               text/css text/javascript text/js text/plain text/xml;
    
    server {
        listen 80 default_server;

        # Redirect all HTTP requests to HTTPS with a 301 Moved Permanently response.
        return 301 https://$host$request_uri;
    }

    server {
        listen 443 ssl http2 reuseport default_server;

        ssl_certificate server.crt;
        ssl_certificate_key server.key;
        ssl_certificate server-ecc.crt;
        ssl_certificate_key server-ecc.key;

        ssl_session_cache shared:SSL:10m;
        ssl_session_timeout 10m;
        ssl_session_tickets off;

        ssl_protocols TLSv1.2;
        ssl_ciphers AESGCM;
        ssl_prefer_server_ciphers on;

        add_header Strict-Transport-Security max-age=15768000;
        add_header X-Frame-Options DENY;

        #ssl_stapling on;
        #ssl_stapling_verify on;
        #ssl_trusted_certificate /etc/certs/ca-certificates.crt;

        location / {
            root   html;
            index  index.html index.htm;
        }
    }
}
EOF

We need a SSL certificate and key as well. See How to create a SSL CA/certificate/key with pktool how to do that. Done? Good.

# cp server.crt /opt/local/conf
# cp server.key /opt/local/conf

Let's create an ECDSA certificate/key as well.

This step here is optional since we already created a CA with pktool. Only do this when you want to go full ECC and don't forget to copy the ECC CA certificate to /etc/certs/CA/ as well!

$ openssl ecparam -genkey -name secp384r1 -out CA.key
$ openssl req -x509 -new -sha256 -nodes -key CA.key -days 3650 -out CA.crt \
  -subj "/C=DE/ST=Berlin/L=Berlin/O=My Company/OU=Unix Dep/CN=Unix Dep CA/emailAddress=unix.dep@mycompany.com"

Decided which CA to use? Good then let's proceed.

$ FQDN=$(perl -mNet::Domain -e 'print Net::Domain::hostfqdn()')
$ HOSTNAME=$(uname -n)
$ cat << EOF > csr.cnf
[req]
req_extensions     = v3_req
distinguished_name = req_distinguished_name

[ req_distinguished_name ]
countryName                     = Country Name (2 letter code)
stateOrProvinceName             = State or Province Name (full name)
localityName                    = Locality Name (eg, city)
0.organizationName              = Organization Name (eg, company)
organizationalUnitName          = Organizational Unit Name (eg, section)
commonName                      = Common Name (e.g. server FQDN or YOUR name)
emailAddress                    = Email Address

[ v3_req ]
basicConstraints = CA:FALSE
keyUsage         = nonRepudiation, digitalSignature, keyEncipherment
extendedKeyUsage = serverAuth
subjectAltName   = @alt_names

[alt_names]
DNS.1 = $FQDN
DNS.2 = $HOSTNAME
EOF

$ openssl ecparam -genkey -name secp384r1 -out server-ecc.key
$ openssl req -new -sha256 -nodes -key server-ecc.key -days 365 -out server-ecc.csr -config csr.cnf \
  -subj "/C=DE/ST=Berlin/L=Berlin/O=My Company/OU=Unix Dep/CN=$FQDN/emailAddress=webservd@$FQDN"
$ openssl x509 -req -sha256 -days 365 -in server-ecc.csr -CA CA.crt -CAkey CA.key -CAcreateserial \
  -out server-ecc.crt -extfile csr.cnf -extensions v3_req

# cp server-ecc.crt /opt/local/conf
# cp server-ecc.key /opt/local/conf

Certificates and keys created? Excellent. Let's start nginx now and try connecting via ECDSA TLS 1.2 and HTTP/2.

# /opt/local/sbin/nginx -t
nginx: the configuration file /opt/local/conf/nginx.conf syntax is ok
nginx: configuration file /opt/local/conf/nginx.conf test is successful

# /opt/local/sbin/nginx

$ openssl s_client -connect $(uname -n):443 -tls1_2 -cipher ECDHE-ECDSA-AES128-GCM-SHA256 < /dev/null
...
Server Temp Key: ECDH, P-256, 256 bits
...
SSL-Session:
    Protocol  : TLSv1.2
    Cipher    : ECDHE-ECDSA-AES128-GCM-SHA256
...

And Firefox reports that HTTP/2 is being used as well.

Firefox Web Developer Network Headers

Links

Wednesday, April 26, 2017

Oracle Directory Server Enterprise Edition 11 and pkcs11 on-chip crypto on SPARC-64 X+/X

Oracle Directory Server Enterprise Edition 11 and pkcs11 on-chip crypto on SPARC-64 X+/X

We recently migrated a bunch of DSEE 11 applications from Fujitsu M4000 machines to Fujitsu M10 servers and somehow they're not using the SPARC64-X+/X on-chip AES/SHA crypto capabilities.

# isainfo -v
64-bit sparcv9 applications
        fjorclnum fjieeedec fjaes ima fjdes fjathhpc fmaf asi_blk_init vis2
        vis popc
# truss -u libucrypto::athena_\* -c -p $(pgrep ns-slapd)
... wait till some ldaps connection were served...
^C
...nothing :-(

Let's fix that.

According to SPARC64™ X+/X On-Chip Cryptographic Processing Capabilities the M10 CPUs are capable of:

SPARC64™ X+/X processors support AES, DES, 3DES, RSA, SHA and DSA encryption models.

We keep that list in mind. To get things started we need to find the directory with the NSS certificate database files.

# find /local/ds -name "*-cert8.db" -type f
/local/ds/alias/slapd-cert8.db

We have to export the default cert in there and tell our running DSEE instance to use the M10's cryptographic hardware. We don't do this as root but as the dsee user.

$ pktool setpin
Enter token passphrase: # default password is changeme
Create new passphrase:
Re-enter new passphrase:
Passphrase changed.

$ dsadm export-cert -o ns-slapd.crt /local/ds defaultCert
Choose the PKCS#12 file password:
Confirm the PKCS#12 file password:

$ dsconf set-server-prop 'ssl-rsa-security-device:Sun Metaslot'
Directory Server must be restarted for changes to take effect.

Let's disable ns-slapd for a second to add the pkcs11 module. The slapd-pin.txt password is the one we entered while running pktool setpin. The mechanism list should represent what the SPARC64-X CPUs support.

$ dsadm stop /local/ds

$ modutil -add "Solaris Kernel Crypto Driver" -libfile \
 /usr/lib/64/libpkcs11.so -dbdir /local/ds/alias -dbprefix slapd- \
  -mechanisms AES:DES:RSA:SHA1:SHA256:SHA512:DSA

WARNING: Performing this operation while the browser is running could cause
corruption of your security databases. If the browser is currently running,
you should exit browser before continuing this operation. Type
'q <enter>' to abort, or <enter> to continue:

$ modutil -enable "Solaris Kernel Crypto Driver" \
 -dbdir /local/ds/alias -dbprefix slapd-

WARNING: Performing this operation while the browser is running could cause
corruption of your security databases. If the browser is currently running,
you should exit browser before continuing this operation. Type
'q <enter>' to abort, or <enter> to continue:

Slot "Sun Metaslot" enabled.

$ pk12util -i ns-slapd.crt -d /local/ds/alias/ -P slapd- -h "Sun Metaslot"
Enter Password or Pin for "Sun Metaslot":
Enter password for PKCS12 file:
pk12util: PKCS12 IMPORT SUCCESSFUL

$ certutil -M -n "Sun Metaslot:defaultCert" -t CTu -d /local/ds/alias -P slapd-
Enter Password or Pin for "Sun Metaslot":

$ echo "Sun Metaslot:XXXpassword" > /local/ds/alias/slapd-pin.txt

$ certutil -L -d /local/ds/alias -P slapd-
Certificate Nickname                                         Trust Attributes
                                                             SSL,S/MIME,JAR/XPI
Unix Dep CA                                                  ,,

$ certutil -M -n "Unix Dep CA" -t CT -d /local/ds/alias/ -P slapd-

$ dsadm start /local/ds

Are we there yet?

# pldd $(pgrep ns-slapd) | grep pkcs11
/usr/lib/sparcv9/libpkcs11.so.1
/usr/lib/security/sparcv9/pkcs11_softtoken.so.1

# truss -u libucrypto::athena_\* -c -p $(pgrep ns-slapd)
... start some ldaps:// or STARTTLS ldapsearch'es...
^C
ibrary:             Function                                 calls
libucrypto:          athena_sha1_block                        418
libucrypto:          athena_sha1_multiblock                   246
libucrypto:          athena_sha256_block                      118
libucrypto:          athena_sha256_multiblock                 30
...

$ dsadm show-access-log /local/ds/alias
...
[26/Apr/2017:08:57:41 +0200] conn=228 op=-1 msgId=-1 - SSL 128-bit AES-128-GCM
...

Well... That's rather disappointing. We see Athena library calls for hardware checksums but nothing for any symmetric crypto. Seems like the LDAP clients use ciphers our SPARC64-X+/X can't do in hardware.

So we're not quite done yet. Let's enable only SPARC64-X+/X friendly ciphers.

$ dsconf get-server-prop -h $(uname -n) -P 1636 ssl-supported-ciphers | grep AES | grep -v AESGCM
...
ssl-supported-ciphers  :  TLS_RSA_WITH_AES_128_CBC_SHA
ssl-supported-ciphers  :  TLS_RSA_WITH_AES_256_CBC_SHA
...

$ dsconf set-server-prop -h $(uname -n) -P 1636 \
  ssl-cipher-family:TLS_RSA_WITH_AES_128_CBC_SHA \
  ssl-cipher-family:TLS_RSA_WITH_AES_256_CBC_SHA
Before setting SSL configuration, export Directory Server data.
Do you want to continue [y/n] ?  y
Directory Server must be restarted for changes to take effect.

$ dsadm restart /local/ds

Pretty please?!

# truss -u libucrypto::athena_\* -c -p $(pgrep ns-slapd)
... start some ldaps:// or STARTTLS ldapsearch'es...
libucrypto:          athena_sha1_block                        6220
libucrypto:          athena_sha1_multiblock                   3975
libucrypto:          athena_AES_cbc_encrypt                   472
libucrypto:          athena_AES_encrypt_cbc_s                 472
libucrypto:          athena_aes128_cbc_encrypt                472
libucrypto:          athena_aes128_load_keys_for_encrypt      472
libucrypto:          athena_copy_key_s                        472
libucrypto:          athena_sha256_block                      380
libucrypto:          athena_AES_decrypt_cbc_s                 157
libucrypto:          athena_sha256_multiblock                 87
libucrypto:          athena_AES_cbc_decrypt                   80
libucrypto:          athena_aes128_cbc_decrypt                80
libucrypto:          athena_aes128_load_keys_for_decrypt      80
libucrypto:          athena_DES3_encrypt_s                    36
libucrypto:          athena_AES_set_encrypt_key               24
libucrypto:          athena_aes_expand128                     24
libucrypto:          athena_AES_decrypt_cbc_4unrolling_s      18
libucrypto:          athena_AES_decrypt_cbc_8unrolling_s      14
libucrypto:          athena_des3_ecb_encrypt                  12
libucrypto:          athena_des3_load_keys                    12
...

Lovely!

PS: the only hardware capable ciphers seem to be: TLS_RSA_WITH_AES_128_CBC_SHA, TLS_RSA_WITH_AES_256_CBC_SHA, TLS_RSA_WITH_3DES_EDE_CBC_SHA and TLS_RSA_WITH_DES_CBC_SHA.

Links

Monday, April 24, 2017

How to add a SRU to a local IPS repository

How to add a SRU to a local IPS repository

Last time we created a local IPS https repository, see HTTPS IPS repository using pkg.depotd.

The April CPU just came out, so let's add the latest and greatest SRU (19.5 at the time of writing this) to our local repository. Go to MOS and search for "Oracle Solaris 11.3 Support Repository Updates (SRU) Index (Doc ID 2045311.1)" to download the newest IPS Repository

Six gigabytes later you should have five files.

# ls
p25791246_1100_SOLARIS64_1of4.zip   p25791246_1100_SOLARIS64_3of4.zip   p25791250_1100_SOLARIS64.zip
p25791246_1100_SOLARIS64_2of4.zip   p25791246_1100_SOLARIS64_4of4.zip

Instead of just adding the new SRU bits to the repository we're following the official documentation to minimize repository downtime, see How to Update a Local IPS Package Repository.

Update a copy of the repository. This practice helps ensure that systems do not access the repository while the repository is being updated. Create a snapshot of your repository before you update the repository, clone the snapshot, perform the update, and replace the original repository with the updated clone.

Sounds good, let's do that (the pkgrepo verify step is optional).

# zfs clone tank/install/pkgrepo/solaris@ga tank/install/pkgrepo/solaris_tmp

# unzip p25791250_1100_SOLARIS64.zip
...
# LC_ALL=C ./install-repo.ksh -c -d /install/pkgrepo/solaris_tmp -y
Using p25791246_1100_SOLARIS64 files for sol-11_3_19_5_0-incr-repo download.

Comparing digests of downloaded files...done. Digests match.
...
Initiating repository rebuild.

# pkgrepo -s /install/pkgrepo/solaris_tmp verify
This is where the IPS repository downtime starts.
# svcadm disable -s pkg/server:solaris
# zfs promote tank/install/pkgrepo/solaris_tmp
# zfs rename tank/install/pkgrepo/solaris tank/install/pkgrepo/solaris_old
# zfs rename tank/install/pkgrepo/solaris_tmp tank/install/pkgrepo/solaris
# svcadm enable pkg/server:solaris

And our repository is back online. Just a little housekeeping left before we're done.

# zfs destroy tank/install/pkgrepo/solaris_old
# zfs snapshot tank/install/pkgrepo/solaris@sru19

And that's it. Our Solaris clients should see installed packages that have newer versions available when running pkg list -u. If not refreshing the publisher metadata with pkg refresh should help.

Read the next part at AI install server using a https IPS repo.

Links

Thursday, April 20, 2017

SonarQube with MySQL 5.7

SonarQube with MySQL 5.7

Welcome back.

Last time we used some tricks to get SonarQube running on Solaris 11.3/SPARC again (see SonarQube 6.3.1 on Solaris 11 SPARC).

There's a big warning when you open http://your.hostname:9000 in a browser though:

Embedded database should be used for evaluation purpose only

The embedded database will not scale, it will not support upgrading to newer versions of SonarQube, and there is no support for migrating your data out of it into a different database engine.

Let's fix that and use a real database management system. We're doing this in a LDOM again with c1d1 as our non-OS database LUN.

# pkg install --no-backup-be database/mysql-57 database/mysql-57/client
# zpool create tank c1d1
# zfs create tank/mysql
# zfs create -o recordsize=16k -o primarycache=metadata tank/mysql/data
# zfs create -o compression=lz4 tank/mysql/log
# chown -R mysql:mysql /tank/mysql

Now setup the MySQL database for SonarQube.

# cat << EOF >> /etc/mysql/5.7/my.cnf
bind_address=localhost
datadir=/tank/mysql/data
innodb_log_group_home_dir=/tank/mysql/log
datadir=/tank/mysql/data
innodb_buffer_pool_size=2g
innodb_buffer_pool_instances=4
innodb_log_file_size=256M
innodb_log_buffer_size=4M
innodb_checksum_algorithm=strict_crc32
query_cache_type=0
innodb_flush_log_at_trx_commit=2
skip-innodb_doublewrite
max_allowed_packet=128M
# use 256M pages on SPARC
large-pages
super-large-pages
secure_file_priv=NULL
explicit_defaults_for_timestamp
ssl-ca=ca.pem
ssl-cert=server-cert.pem
ssl-key=server-key.pem
EOF

# svccfg -s mysql:version_57 setprop mysql/data=/tank/mysql/data
# svccfg -s mysql:version_57 refresh
# svcadm enable mysql:version_57

# /usr/mysql/5.7/bin/mysql_ssl_rsa_setup
Generating a 2048 bit RSA private key
...
writing new private key to 'client-key.pem'
# chown mysql:mysql /tank/mysql/data/*.pem

Good, the database is up and running. Let's set a new root password, secure the database and create the sonar MySQL user.

# grep 'temporary password' /tank/mysql/data/$(uname -n).err
2017-04-19T10:00:19.759911Z 1 [Note] A temporary password is generated for root@localhost: ziIzhs/Kl8_X
# /usr/mysql/5.7/bin/mysql_secure_installation
...

# /usr/mysql/5.7/bin/mysql -u root -p << EOF
CREATE DATABASE sonar CHARACTER SET utf8mb4 COLLATE utf8mb4_unicode_ci;
GRANT ALL PRIVILEGES ON sonar.* TO 'sonar'@'localhost' IDENTIFIED BY 'HsOzwm78vxJz0JlE';
FLUSH PRIVILEGES;
quit
EOF

Last thing, tell SonarQube how to use the new sonar MySQL database.

# perl -w -pi -e 's/^#(sonar.jdbc.username=)$/${1}sonar/; s/^#(sonar.jdbc.password=)$/${1}HsOzwm78vxJz0JlE/' \
  /opt/sonarqube-6.3.1/conf/sonar.properties
# perl -w -pi -e 's/^#(sonar.jdbc.url=jdbc:mysql.*)$/${1}&useSSL=false&maxAllowedPacket=67108864/' \
  /opt/sonarqube-6.3.1/conf/sonar.properties

Restart SonarQube and check if it works.

# /opt/sonarqube-6.3.1/bin/solaris-sparc-64/sonar.sh restart
Stopping SonarQube...
Waiting for SonarQube to exit...
Stopped SonarQube.
Starting SonarQube...
Started SonarQube.

# tail -f /opt/sonarqube-6.3.1/logs/sonar.log
...
2017.04.19 12:18:14 INFO  app[][o.s.application.App] SonarQube is up

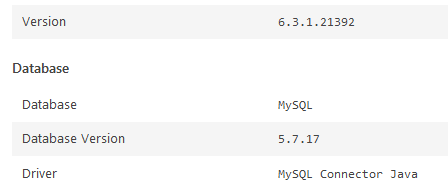
Excellent.

SonarQube System Info

Read the next part at SonarQube running as non-root behind a SSL reverse proxy.

Links

Wednesday, April 19, 2017

LDOMs with SR-IOV NET and SR-IOV FC

LDOMs with SR-IOV NET and SR-IOV FC

So we got this shiny new S7-2 (running Solaris 11.3 SRU 18 and firmware 9.7.5.b) for testing. It has two 16Gb QLogic Fibre Channel adapters and a rather weird onboard network/SAS controller bus assignment:

# ldm ls-io -l
...
/SYS/MB/NET0                               PCIE   pci_0    primary   OCC
[pci@300/pci@1/pci@0/pci@1]
    network@0
    network@0,1
    network@0,2
...
/SYS/MB/RISER3/PCIE4                       PCIE   pci_2    primary   OCC
[pci@302/pci@2/pci@0/pci@14]
    LSI,sas@0/iport@4
    LSI,sas@0/iport@8

Looks like a primary/secondary setup is off the table. So let's create some fully SR-IOV'd LDOMs instead.

First make sure IOV is on.

# ldm ls-io | grep BUS
NAME                                       TYPE   BUS      DOMAIN    STATUS
pci_0                                      BUS    pci_0    primary   IOV
pci_2                                      BUS    pci_2    primary   IOV

and that we have Physical Function devices already:

# ldm ls-io | grep PF
/SYS/MB/NET0/IOVNET.PF1                    PF     pci_0    primary
/SYS/MB/NET0/IOVNET.PF2                    PF     pci_0    primary
/SYS/MB/NET0/IOVNET.PF0                    PF     pci_0    primary
/SYS/MB/NET0/IOVNET.PF3                    PF     pci_0    primary

Hm? That's strange, no IOVFC devices?! A quick MOS search leads to "Unable To Create SR-IOV Virtual Instance For Qlogic 16 Gb Fibre Channel PCIe Universal Host Bus Adapter (Doc ID 1950167.1)".

Looks like we need a newer firmware! What's my QLogic Fibre Channel adapter part number again? Let's check via ILOM:

-> show /System/PCI_Devices/Add-on/Device_3

 /System/PCI_Devices/Add-on/Device_3
    Targets:

    Properties:
        part_number = 7101674

Time to download "QLE8362 (7101674) SRIOV Flash Kit for Solaris FC Adapters".

# unzip Oracle_QLE8362_SRIOV_Flash_Kit_07.zip
...
# cd XXX 
# ./update_sol.sh .
Flashing Board Config Data...
Installation directory: /usr/lib/ssm/fwupdate/qlogic
Working dir: /var/tmp/sriov
Updating Board Config parameters of HBA instance 0 - QLE8362...
Success
... many many lines ...
Flash update complete. Changes have been saved to all ports of this HBA.
You must reboot in order for the changes to become effective.

Reboot time... Sooo? Do we have our IOVFC devices now?

# ldm ls-io | grep IOVFC
/SYS/MB/RISER3/PCIE3/IOVFC.PF0             PF     pci_0    primary
/SYS/MB/RISER3/PCIE3/IOVFC.PF1             PF     pci_0    primary
/SYS/MB/RISER1/PCIE1/IOVFC.PF0             PF     pci_2    primary
/SYS/MB/RISER1/PCIE1/IOVFC.PF1             PF     pci_2    primary

Yay! Let's start (you can skip the set-io iov=on if you alread have them, if not that's how you enable IOV).

# ldm add-vds primary-vds0 primary
# ldm add-vcc port-range=5000-5100 primary-vcc0 primary
# ldm set-core 4 primary
# svcadm enable vntsd
# ldm start-reconf primary
# ldm set-mem 16g primary
# ldm set-io iov=on pci_0
# ldm set-io iov=on pci_2
# shutdown -y -g0 -i6

# ldm set-domain failure-policy=reset primary
# ldm add-spconfig initial

Network cables on net1/net2 are for LDOMs (IPMP config). Yes I know, we should add another NIC to the last free PCIe port and use that for the second port... Anyway, let's match net1/2 with IOVNET.PF? just to be sure:

# dladm show-phys | egrep 'net(1|2)'
net1              Ethernet             up         1000   full      i40e1
net2              Ethernet             up         1000   full      i40e2

# ldm ls-io | grep IOVNET.PF
/SYS/MB/NET0/IOVNET.PF1                    PF     pci_0    primary
/SYS/MB/NET0/IOVNET.PF2                    PF     pci_0    primary
...
# ldm ls-io -l /SYS/MB/NET0/IOVNET.PF1
NAME                                       TYPE   BUS      DOMAIN    STATUS
----                                       ----   ---      ------    ------
/SYS/MB/NET0/IOVNET.PF1                    PF     pci_0    primary
[pci@300/pci@1/pci@0/pci@1/network@0,1]
    maxvfs = 31

# grep pci@300/pci@1/pci@0/pci@1/network@0,1 /etc/path_to_inst
"/pci@300/pci@1/pci@0/pci@1/network@0,1" 1 "i40e"

So net1 is i40e1 and i40e1 is "/pci@300/pci@1/pci@0/pci@1/network@0,1", which is IOVNET.PF1. Same with net2:

# ldm ls-io -l /SYS/MB/NET0/IOVNET.PF2
NAME                                       TYPE   BUS      DOMAIN    STATUS
----                                       ----   ---      ------    ------
/SYS/MB/NET0/IOVNET.PF2                    PF     pci_0    primary
[pci@300/pci@1/pci@0/pci@1/network@0,2]
    maxvfs = 31

# grep pci@300/pci@1/pci@0/pci@1/network@0,2 /etc/path_to_inst
"/pci@300/pci@1/pci@0/pci@1/network@0,2" 2 "i40e"

# ldm create-vf -n 4 /SYS/MB/NET0/IOVNET.PF1
# ldm create-vf -n 4 /SYS/MB/NET0/IOVNET.PF2
# ldm ls-io | grep VF
...
/SYS/MB/NET0/IOVNET.PF1.VF0                VF     pci_0
/SYS/MB/NET0/IOVNET.PF2.VF0                VF     pci_0
...

Create PFs for the QLogic Fibre Channel SAN cards as well (connected to Fabric via first port on each HBA):

# ldm create-vf -n 4 /SYS/MB/RISER3/PCIE3/IOVFC.PF0
# ldm create-vf -n 4 /SYS/MB/RISER1/PCIE1/IOVFC.PF0

Make sure NPIV support is enabled on the Brocade switch port:

switch:admin> portcfgshow x/xx | grep NPIV
NPIV capability           ON
...

Good, primary is configured, VFs are there, two LUNs created (one for the OS, one for aux data). Time to create the first LDOM guest (we're using port VLAN IDs for all LDOMs/zones, that's why we have to set the pvid).

# ldm add-dom ldg1
# ldm set-core 4 ldg1
# ldm set-mem 32g ldg1
# ldm set-domain master=primary ldg1

# ldm add-io /SYS/MB/NET0/IOVNET.PF1.VF0 ldg1
# ldm add-io /SYS/MB/NET0/IOVNET.PF2.VF0 ldg1
# ldm set-io pvid=1234 /SYS/MB/NET0/IOVNET.PF1.VF0
# ldm set-io pvid=1234 /SYS/MB/NET0/IOVNET.PF2.VF0

# ldm add-io /SYS/MB/RISER3/PCIE3/IOVFC.PF0.VF0 ldg1
# ldm add-io /SYS/MB/RISER1/PCIE1/IOVFC.PF0.VF0 ldg1

# ldm set-var auto-boot\?=false ldg1

# ldm add-vdsdev options=ro /net/installsrv.mycompany.com/export/.../sol-11_3_18_6_0-text-sparc.iso solaris@primary-vds0
# ldm add-vdisk solaris solaris@primary-vds0 ldg1

# ldm bind-domain ldg1
# ldm start-domain ldg1
# telnet localhost 5000
{0} ok devalias
solaris                  /virtual-devices@100/channel-devices@200/disk@0
...
{0} ok boot solaris

Installation complete? Then we're almost done...

# ldm set-var auto-boot\?=true ldg1
# ldm set-var multipath-boot\?=true ldg1
# ldm set-domain boot-policy=enforce ldg1

The boot-device eeprom variable is interesting (I added the second path):

# ldm list-var boot-device ldg1
boot-device=/pci@300/pci@2/pci@0/pci@13/SUNW,qlc@0,2/fp@0,0/disk@w5006016xxxxxxxd6,0:a \
/pci@302/pci@1/pci@0/pci@11/SUNW,qlc@0,2/fp@0,0/disk@w5006016xxxxxxxd6,0:a

We're booting from LUN 0 and with multipath-boot set to yes it'll try both paths (on each HBA). Neat.

We could remove the solaris vdisk and we should definitely run ldm add-spconfig to save the current LDOM config. Enabling MPxIO and IPMP in ldg1 is on the TODO, too...

Links

Tuesday, April 18, 2017

HTTPS IPS repository using pkg.depotd

HTTPS IPS repository using pkg.depotd

Say we have a company rule stating that all network traffic has to be encrypted. So let's create a new IPS package repo with https-only access.

We'll do that in a LDOM (NGZ or KZ is fine, too) with a separate LUN.

# zpool create tank c1d1
# zfs create -o mountpoint=/install tank/install
# zfs create -o atime=off tank/install/pkgrepo
# zfs create tank/install/pkgrepo/solaris

Now download the repository from Oracle Solaris 11.3 Repository

# LC_ALL=C ./install-repo.ksh -c -d /install/pkgrepo/solaris
Using sol-11_3-repo download.

Comparing checksums of downloaded files...done. Checksums match.

Uncompressing sol-11_3-repo_1of5.zip...done.
Uncompressing sol-11_3-repo_2of5.zip...done.
Uncompressing sol-11_3-repo_3of5.zip...done.
Uncompressing sol-11_3-repo_4of5.zip...done.
Uncompressing sol-11_3-repo_5of5.zip...done.

Repository can be found in /install/pkgrepo/solaris.

# zfs snapshot tank/install/pkgrepo/solaris@ga

# pkgrepo -s /install/pkgrepo/solaris list entire
PUBLISHER NAME                                          O VERSION
solaris   entire                                          0.5.11-0.175.3.1.0.5.0:20151006T140051Z

And create a new solaris image packaging repository service entity.

# svccfg -s pkg/server add solaris
# svccfg -s pkg/server:solaris
svc:/application/pkg/server:solaris> setprop pkg/inst_root = /install/pkgrepo/solaris
svc:/application/pkg/server:solaris> setprop pkg/standalone = boolean: false
svc:/application/pkg/server:solaris> setprop pkg/readonly = boolean: true
svc:/application/pkg/server:solaris> refresh
svc:/application/pkg/server:solaris> ^D

Time to install pkg.depotd.

# pkg install --no-backup-be package/pkg/depot

See How to create a SSL CA/certificate/key with pktool how to create a new SSL CA/cert/key. The next steps depend on this.

# cp CA.crt /etc/pkg/depot/server-ca.crt
# cp server.crt /etc/pkg/depot/server.crt
# cp server.key /etc/pkg/depot/server.key
# chown pkg5srv:pkg5srv /etc/pkg/depot/server*

Good, we have a CA certificate and a key/certificate for our webserver. We can make pkg.depotd https aware now.

# cat << 'EOF' > /etc/pkg/depot/conf.d/pkcs11.conf
SSLCryptoDevice pkcs11
SSLProtocol TLSv1.2
SSLCipherSuite AESGCM:AES
SSLHonorCipherOrder on
SSLCompression off
SSLSessionTickets off

# HSTS (mod_headers is required) (15768000 seconds = 6 months)
Header always set Strict-Transport-Security "max-age=15768000"
EOF

# chgrp bin /etc/pkg/depot/conf.d/pkcs11.conf

Now setup pkg.depotd

# svccfg -s application/pkg/depot:default
svc:/application/pkg/depot:default> setprop config/host = pkg.mycompany.com
svc:/application/pkg/depot:default> setprop config/port = 443
svc:/application/pkg/depot:default> setprop config/https = boolean: true
svc:/application/pkg/depot:default> setprop config/ssl_ca_cert_file = "/etc/pkg/depot/server-ca.crt"
svc:/application/pkg/depot:default> setprop config/ssl_cert_file = "/etc/pkg/depot/server.crt"
svc:/application/pkg/depot:default> setprop config/ssl_key_file = "/etc/pkg/depot/server.key"
svc:/application/pkg/depot:default> refresh
svc:/application/pkg/depot:default> ^D

Sadly, pkg.depotd has some problems when the repository is https-only (when you dig into the SMF start script you'll see that it's using curl on a http:// URL to check if the depot is up), so we have to fix that before starting pkg/depot:

# perl -w -pi -e 's/(url="http):/$1s:/' /lib/svc/method/svc-pkg-depot

# svcadm enable svc:/application/pkg/server:solaris
# svcadm enable svc:/application/pkg/depot:default

You should have a https-only pkg repository running at https://pkg.mycompany.com now. If not check /var/log/pkg/depot/error_log for errors.

$ openssl s_client -connect pkg.mycompany.com:443 < /dev/null
...
New, TLSv1/SSLv3, Cipher is DHE-RSA-AES256-GCM-SHA384
Server public key is 2048 bit
Secure Renegotiation IS supported
Compression: NONE
Expansion: NONE
No ALPN negotiated
...
    Verify return code: 0 (ok)

The apache logfiles in /var/log/pkg/depot/ are not rotated by default. Let's add some logadm rules to do that.

# cat << 'EOF' > /etc/logadm.d/pkg-depot.logadm.conf
/var/log/pkg/depot/access_log -C 4 -N -a '/usr/sbin/svccfg -s svc:/application/pkg/depot:default refresh'
/var/log/pkg/depot/error_log -C 4 -N -a '/usr/sbin/svccfg -s svc:/application/pkg/depot:default refresh'
/var/log/pkg/depot/rewrite.log -C 4 -N -a '/usr/sbin/svccfg -s svc:/application/pkg/depot:default refresh'
EOF
# chgrp sys /etc/logadm.d/pkg-depot.logadm.conf
# chmod 444 /etc/logadm.d/pkg-depot.logadm.conf
# svcadm refresh logadm-upgrade

What's next? Distribute CA.crt to all our Solaris 11 clients (put it in /etc/certs/CA/UNIX_Dep_CA.pem and run svcadm refresh svc:/system/ca-certificates:default) and add the new repo with pkg set-publisher -G '*' -g https://pkg.mycompany.com solaris.

We should also keep in mind that we have to run svcadm restart pkg/depot when adding new SRUs.

Read the next part at How to add a SRU to a local IPS repository or Veritas InfoScale 7.3.1 IPS repo how to add another repo.

Links

Monday, April 17, 2017

How to create a SSL CA/certificate/key with pktool

How to create a SSL CA/certificate/key with pktool

We'll create some SSL certificates for our https IPS repo and a SonarQube SSL reverse proxy in the next few blog posts. This post is about how to use pktool to do that.

Let's start with creating a new CA. The default RSA key length is 2048 bit and the default hash algorithm is SHA-256 which should both be fine till 2022.

$ FQDN=$(perl -mNet::Domain -e 'print Net::Domain::hostfqdn()')
$ HOSTNAME=$(hostname)

$ CA_ISSUER="C=DE, ST=Berlin, L=Berlin, O=My Company, OU=Unix Dep, emailAddress=unix.dep@$FQDN, CN=Unix Dep CA"
$ CA_SERIAL=$(perl -e 'print time;' | digest -a md5 | sed 's/^../0x/')
$ pktool gencert keystore=file format=pem serial=$CA_SERIAL \
  keyusage=keyCertSign outkey=CA.key outcert=CA.crt  \
  lifetime=3-year keytype=rsa \
  subject="$CA_ISSUER" 

Congratulations, you're a CA now ;-)

Now we can create SSL keys/certificates. CN and DNS altname *must* be our servers FQDN.

$ pktool gencsr keystore=file format=pem keytype=rsa \
  outkey=server.key outcsr=server.csr eku=serverAuth \
  subject="C=DE, ST=Berlin, L=Berlin, O=My Company, OU=Unix Dep, emailAddress=webservd@FQDN, CN=$FQDN" \
  altname="DNS=$FQDN,DNS=$HOSTNAME" \
  keyusage=digitalSignature,nonRepudiation,keyEncipherment

Let's sign the certificate signing request with our CA.

$ CERT_SERIAL=$(perl -e 'print time;' | digest -a md5 | sed 's/^../0x/')

$ pktool signcsr keystore=file format=pem serial=$CERT_SERIAL \
  csr=server.csr signkey=CA.key outcert=server.crt lifetime=1-year \
  eku=serverAuth issuer="$CA_ISSUER"
  

And we're done. The CA certificate in CA.crt belongs to /etc/certs/CA.

# cp CA.crt /etc/certs/CA/UNIX_Dep_CA.pem
# chown root:sys /etc/certs/CA/UNIX_Dep_CA.pem
# svcadm refresh -s svc:/system/ca-certificates:default
# ls -l /etc/openssl/certs/ | grep UNIX
lrwxrwxrwx   1 root     root          30 Apr 18 10:14 3b6acb2b.0 -> ../../certs/CA/UNIX_Dep_CA.pem

The files server.crt and server.key are used for the SSL web/ldap/etc. server.

Links

Thursday, April 13, 2017

OMG We have so many TCP retransmits... Or not.

OMG We have so many TCP retransmits... Or not.

So you came into the office and a chat window pops up, saying a Solaris 11 zone is having issues. The problem was already found, TCP retransmits all over the place...

$ netstat -s -P tcp | /usr/xpg4/bin/grep -E 'tcpOutDataBytes|tcpRetransBytes'
        tcpOutDataSegs      =3943655938 tcpOutDataBytes     =868103525
        tcpRetransSegs      =588588     tcpRetransBytes     =516389125

Not bad, that's a 60 % retransmission rate.

Is it? We recall our SA-400 Solaris System performance management training and start investigating.

First, let's check if netstat is based on dtrace, procfs or kstat...

$ truss -ftioctl netstat -s -P tcp
28803:  ioctl(3, I_PUSH, "tcp")                         = 0
28803:  ioctl(3, I_PUSH, "udp")                         = 0
28803:  ioctl(3, I_PUSH, "icmp")                        = 0
28803:  ioctl(4, KSTAT_IOC_CHAIN_ID, 0x00000000)        = 3714269
28803:  ioctl(4, KSTAT_IOC_READ, "kstat_headers")       Err#12 ENOMEM
28803:  ioctl(4, KSTAT_IOC_READ, "kstat_headers")       = 3714269
28803:  ioctl(1, TCGETA, 0xFF59C734)                    = 0
...

So it's using the venerable kstat provider...

$ kstat -p tcp:0:tcp:outDataBytes -p tcp:0:tcp:retransBytes
tcp:0:tcp:outDataBytes  2065463549
tcp:0:tcp:retransBytes  517472499

That rings some bells... Let's check the source (should still be valid for Solaris 11.3) at http://src.illumos.org/source/xref/illumos-gate/usr/src/uts/common/inet/tcp/tcp_stats.c#470

470     { "outDataBytes",   KSTAT_DATA_UINT32, 0 },
471     { "retransBytes",   KSTAT_DATA_UINT32, 0 },

Looks like the counters are using uint32_t integer types. See Fixed width integer types

And uint32_t can get how big exactly (/usr/include/stdint.h includes /usr/include/sys/stdint.h which includes /usr/include/sys/int_limits.h)?

$ grep -w UINT32_MAX /usr/include/sys/*
...
/usr/include/sys/int_limits.h:#define   UINT32_MAX      (4294967295U)

So we get an outDataBytes integer overflow every UINT32_MAX bytes.

$ kstat -p tcp:0:tcp:outDataBytes -p tcp:0:tcp:retransBytes 5
tcp:0:tcp:outDataBytes  4260947220
tcp:0:tcp:retransBytes  519501630

tcp:0:tcp:outDataBytes  4292542537
tcp:0:tcp:retransBytes  519502160

wait for it...

tcp:0:tcp:outDataBytes  66427847
tcp:0:tcp:retransBytes  519528716

Guess our 60 % TCP retransmission rate is not what it seems.

Let's use DTrace just to make sure.

# cat tcp_retransmits.d
#!/usr/sbin/dtrace -s

#pragma D option quiet

tcp:::send
/ (args[2]->ip_plength - args[4]->tcp_offset) > 0 /
{
    @transmit[args[2]->ip_daddr, args[4]->tcp_dport] =
        sum(args[2]->ip_plength - args[4]->tcp_offset);
}

tcp:::send
/ (args[2]->ip_plength - args[4]->tcp_offset) > 0 &&
  args[3]->tcps_retransmit == 1/
{
    @retransmit[args[2]->ip_daddr, args[4]->tcp_dport] =
        sum(args[2]->ip_plength - args[4]->tcp_offset);
}

tick-5s
{
    printf("%-25s %-15s %-15s %-15s\n",
        "Remote host", "Port", "BytesSent", "BytesResent");

    printa("%-25s %-15d %@-15d %@-15d\n",
        @transmit, @retransmit);

    clear(@transmit);
    clear(@retransmit);
}

# ./tcp_retransmits.d
Remote host           Port            BytesSent       BytesResent
...
10.x.x.x              34286           130646          170
10.x.x.x              53483           5790314         0
10.x.x.x              48394           8183188         2896
10.x.x.x              47664           8602988         0
10.x.x.x              35623           8713439         0
10.x.x.x              52682           8725822         1448
10.x.x.x              48103           8803098         0
10.x.x.x              36497           9101003         510

Nothing to worry about. We have tiny retransmits. Looks like our network is fine.

Do things get better on Solaris 12/11.next? Well netstat is still based on kstat1 and kstat2 doesn't seem to use 64bit integers...

# uname -a
SunOS s12test 5.12 s12_120 sun4v sparc sun4v

# kstat2 -p kstat:/mib2/tcp/tcp/0\;retransBytes -p kstat:/mib2/tcp/tcp/0\;outDataBytes -i 5
...
kstat:/mib2/tcp/tcp/0;outDataBytes      4239688713
kstat:/mib2/tcp/tcp/0;retransBytes      125307

kstat:/mib2/tcp/tcp/0;outDataBytes      142297693
kstat:/mib2/tcp/tcp/0;retransBytes      125307

So that's a nope :(

Links

Wednesday, April 12, 2017

SonarQube 6.3.1 on Solaris 11.3 SPARC

SonarQube 6.3.1 on Solaris 11.3 SPARC

Solaris support was removed from SonarQube 5.4 (see Drop Solaris scripts from distribution). Let's see if we can still get it running (it's just a Java app after all).

First download the most current release, that would be 6.3.1 in our case.

Go to Downloads to do that and then unzip it somewhere (we're using /opt here as per filesystem(5)).

# cd /opt
# unzip .../sonarqube-6.3.1.zip

Let's see, what do we have here...

# vi sonarqube-6.3.1/conf/sonar.properties
# Property values can:^M
...

Ah nasty, config files with CR+LF line endings, let's fix that

# dos2unix sonarqube-6.3.1/conf/sonar.properties sonarqube-6.3.1/conf/sonar.properties
# dos2unix sonarqube-6.3.1/conf/wrapper.conf sonarqube-6.3.1/conf/wrapper.conf

What else do we have...

# ls sonarqube-6.3.1/bin/
jsw-license/          linux-x86-64/         windows-x86-32/
linux-x86-32/         macosx-universal-64/  windows-x86-64/

Well that won't work on SPARC, let's create a new directory...

# mkdir -p sonarqube-6.3.1/bin/solaris-sparc-64/lib
# cp sonarqube-6.3.1/bin/linux-x86-64/sonar.sh sonarqube-6.3.1/bin/solaris-sparc-64/

Now we need a Java Service Wrapper for SPARC. Let's head over to Download the Java Service Wrapper to download one, which would be 64-bit Community SPARC Solaris in our case.

Let's unarchive it somewhere.

# mkdir /tmp/wrapper
# cd /tmp/wrapper
# gzcat .../wrapper-solaris-sparc-64-3.5.32.tar.gz | tar xf -
# cp wrapper-solaris-sparc-64-3.5.32/bin/wrapper /opt/sonarqube-6.3.1/bin/solaris-sparc-64/
# cp wrapper-solaris-sparc-64-3.5.32/lib/libwrapper.so /opt/sonarqube-6.3.1/bin/solaris-sparc-64/lib/

We have to clean up the old wrapper, too...

# rm /opt/sonarqube-6.3.1/lib/jsw/wrapper-3.2.3.jar
# cp wrapper-solaris-sparc-64-3.5.32/lib/wrapper.jar /opt/sonarqube-6.3.1/lib/jsw/wrapper-3.5.32.jar

Last thing, disable the update center since we're on a private network...

# cp /opt/sonarqube-6.3.1/conf/sonar.properties /opt/sonarqube-6.3.1/conf/sonar.properties.default
# perl -w -pi -e 's/^#(sonar.updatecenter.activate=)true/$1false/' /opt/sonarqube-6.3.1/conf/sonar.properties

*drum roll* Does it work?

# /opt/sonarqube-6.3.1/bin/solaris-sparc-64/sonar.sh start
Starting SonarQube...
Started SonarQube.

# tail -f /opt/sonarqube-6.3.1/logs/sonar.log
...
2017.04.12 15:41:42 INFO  app[][o.s.application.App] SonarQube is up

Looks good to me. Go to http://your.hostname:9000/ and enjoy your SonarQube instance running on Solaris/SPARC.

SonarQube 6.3.1 System Info

Read the next part at SonarQube with MySQL 5.7.

Links

389 Directory Server 1.3.x LDAP client authentication

389 Directory Server 1.3.x LDAP client authentication Last time we did a multi-master replication setup, see 389 Directory Server 1.3.x Repl...