Monday, May 14, 2018

Vendor lock-in or let's have some fun with libucrypto

Vendor lock-in or let's have some fun with libucrypto

So one of the new features of Solaris 11.4 is the libucrypto library. They sell it as:

a lightweight library that provides access to hardware accelerated cryptography

Sadly the documentation is... scarce. The only opensource program that seems to be using it is Java.

Anyway, let's code a small sample RC4 (don't ever use RC4 for real world crypto!) program today and verify the cipher text against a known-good test vector. And yes, the plain text input is all zeros.

$ cat ucrypto_rc4.c
#include <libucrypto.h>

#include <assert.h>
#include <stdio.h>
#include <strings.h> // memcmp()

// https://tools.ietf.org/html/rfc6229
static const uchar_t key_str[] = {
    0x01, 0x02, 0x03, 0x04, 0x05, 0x06, 0x07, 0x08
};

static const uchar_t tv3_out[] = {
    0x97, 0xab, 0x8a, 0x1b, 0xf0, 0xaf, 0xb9, 0x61,
    0x32, 0xf2, 0xf6, 0x72, 0x58, 0xda, 0x15, 0xa8,
    0x82, 0x63, 0xef, 0xdb, 0x45, 0xc4, 0xa1, 0x86,
    0x84, 0xef, 0x87, 0xe6, 0xb1, 0x9e, 0x5b, 0x09
};

int
main(void)
{
    const ucrypto_mech_t mech = CRYPTO_RC4;
    int rv = CRYPTO_FAILED;
    int ret = -1;

    size_t out_len = sizeof(tv3_out);

    uchar_t in[out_len];
    memset(&in, 0x0, sizeof(in));

    uchar_t out[out_len];
    memset(&out, 0x1, sizeof(out));

    printf("RFC 6229 key: 0x0102030405060708\n");
    rv = ucrypto_encrypt(mech, key_str, sizeof(key_str),
            NULL, 0,
            in, sizeof(in),
            out, &out_len);
    //printf("errror is %s\n", ucrypto_strerror(rv));
    assert(rv == CRYPTO_SUCCESS);
    ret = memcmp(out, tv3_out, sizeof(tv3_out));
    assert(ret == 0);

    printf("All tests passed\n");

    return 0;
}

$ cc -m64 -Wall ucrypto_rc4.c -lucrypto
$ ./a.out
RFC 6229 key: 0x0102030405060708
All tests passed

Well I'm pretty sure it would be more lines of code with OpenSSL. I'd still advice to use NaCL or OpenSSL though. And please don't use RC4 for anything anymore!

Links

Friday, March 16, 2018

Updating Intel microcode on Solaris 11.3 with ucodeadm

Updating Intel microcode on Solaris 11.3 with ucodeadm

So it's seems Intel finally released a working microcode update for the Spectre CPU flaw. You can download it at https://downloadcenter.intel.com/download/27591/Linux-Processor-Microcode-Data-File.

Done that? Good, let's apply it.

# gzcat microcode-20180312.tgz | tar xf -
# ln -s microcode.dat intel-ucode.txt
# ucodeadm -u intel-ucode.txt
# ucodeadm -v
CPU     Microcode Version
0       0x24
1       0x24
2       0x24
3       0x24
# dmesg | tail
...
Mar 16 10:06:36 solaris unix: [ID 518058 kern.info] cpu0: microcode has been updated from version 0x1c to 0x24
Mar 16 10:06:36 solaris unix: [ID 518058 kern.info] cpu1: microcode has been updated from version 0x1c to 0x24
Mar 16 10:06:36 solaris unix: [ID 518058 kern.info] cpu2: microcode has been updated from version 0x1c to 0x24
Mar 16 10:06:36 solaris unix: [ID 518058 kern.info] cpu3: microcode has been updated from version 0x1c to 0x24

You could copy intel-ucode.txt to /platform/i86pc/ucode/intel-ucode.txt to make this permanent. This will break pkg verify system/kernel/platform though.

Links

Tuesday, January 30, 2018

Kernel Zone Storage Live Migration with ZOSS

Kernel Zone Storage Live Migration with ZOSS

So we have some Kernel Zones on shared storage that need to migrate to another shared storage. Let's do that without any service interruption.

Current status is:

root@global:~ # zonecfg -z kz1 info
...
device 0:
        match not specified
        storage: lu:luname.naa.6006016027802e00084ff53eefdae511
        id: 1
        bootpri not specified
device 1:
        match not specified
        storage: lu:luname.naa.6006016027802e00965dc37eefdae511
        id: 0
        bootpri: 1
...
root@global:~ # fcinfo lu -v
OS Device Name: /dev/rdsk/c0t600000E00D2B0000002B021000940000d0s2
        HBA Port WWN: 2100000e1ed...
                Remote Port WWN: 500000e0dac...
                        LUN: 0
                Remote Port WWN: 500000e0dac...
                        LUN: 0
        HBA Port WWN: 2100000e1ed...
                Remote Port WWN: 500000e0dac...
                        LUN: 0
                Remote Port WWN: 500000e0dac...
                        LUN: 0
        Vendor: FUJITSU
        Product: ETERNUS_DXH
        Device Type: Disk Device
...
OS Device Name: /dev/rdsk/c0t600000E00D2B0000002B021000980000d0s2
        HBA Port WWN: 2100000e1ed...
                Remote Port WWN: 500000e0dac...
                        LUN: 150
                Remote Port WWN: 500000e0dac...
                        LUN: 150
        HBA Port WWN: 2100000e1ed...
                Remote Port WWN: 500000e0dac...
                        LUN: 150
                Remote Port WWN: 500000e0dac...
                        LUN: 150
        Vendor: FUJITSU
        Product: ETERNUS_DXH
        Device Type: Disk Device

Looks good, we see the new LUNs, let's convert the OS Device Name to a ZOSS Storage URI.

root@global:~ # suriadm lookup-uri -t lu /dev/dsk/c0t600000E00D2B0000002B021000940000d0
lu:luname.naa.600000e00d2b0000002b021000940000
...
root@global:~ # suriadm lookup-uri -t lu /dev/dsk/c0t600000E00D2B0000002B021000980000d0
lu:luname.naa.600000e00d2b0000002b021000980000

Let's add them to our kz1 zone config and do a live zone reconfiguration.

root@global:~ # zonecfg -z kz1
zonecfg:kz1> add device
zonecfg:kz1:device> set storage=lu:luname.naa.600000e00d2b0000002b021000980000
zonecfg:kz1:device> set bootpri=1
zonecfg:kz1:device> set id=2
zonecfg:kz1:device> end
zonecfg:kz1> add device
zonecfg:kz1:device> set storage=lu:luname.naa.600000e00d2b0000002b021000940000
zonecfg:kz1:device> set id=3
zonecfg:kz1:device> end
zonecfg:kz1> verify
zonecfg:kz1> commit
zonecfg:kz1> exit
root@global:~ # zoneadm -z kz1 apply
zone 'kz1': Checking: Adding device storage=lu:luname.naa.600000e00d2b0000002b021000940000
zone 'kz1': Checking: Adding device storage=lu:luname.naa.600000e00d2b0000002b021000980000
zone 'kz1': Applying the changes
...

Next steps are inside the Kernel Zone now.

root@kz1:~ # echo | format
Searching for disks...done


AVAILABLE DISK SELECTIONS:
       0. c1d0 <DGC-VRAID-0532-15.00GB>
          /kz-devices@ff/disk@0
       1. c1d1 <DGC-VRAID-0532-65.00GB>
          /kz-devices@ff/disk@1
       2. c1d2 <FUJITSU-ETERNUS_DXH-1070 cyl 1920 alt 0 hd 256 sec 64>
          /kz-devices@ff/disk@2
       3. c1d3 <FUJITSU-ETERNUS_DXH-1070 cyl 8320 alt 0 hd 256 sec 64>
          /kz-devices@ff/disk@3
Specify disk (enter its number): Specify disk (enter its number):

root@kz1:~ # zpool attach rpool c1d0 c1d2
Make sure to wait until resilver is done before rebooting.
root@kz1:~ # zpool attach tank c1d1 c1d3
# wait some time...
root@kz1:~ # zpool status -v
  pool: rpool
 state: ONLINE
  scan: resilvered 7.53G in 33s with 0 errors on Tue Jan 30 15:09:55 2018

config:

        NAME        STATE     READ WRITE CKSUM
        rpool       ONLINE       0     0     0
          mirror-0  ONLINE       0     0     0
            c1d0    ONLINE       0     0     0
            c1d2    ONLINE       0     0     0

errors: No known data errors

  pool: tank
 state: ONLINE
  scan: resilvered 28.9G in 7m40s with 0 errors on Tue Jan 30 15:17:26 2018

config:

        NAME        STATE     READ WRITE CKSUM
        tank        ONLINE       0     0     0
          mirror-0  ONLINE       0     0     0
            c1d1    ONLINE       0     0     0
            c1d3    ONLINE       0     0     0

errors: No known data errors
root@kz1:~ # zpool detach rpool c1d0
root@kz1:~ # zpool detach tank c1d1
root@kz1:~ # bootadm install-bootloader

And that's almost it. Last thing is to remove the old storage LUNs from the Kernel Zone.

root@global:~ # zonecfg -z kz1
zonecfg:kz1> remove device id=0
zonecfg:kz1> remove device id=1
zonecfg:kz1> verify
zonecfg:kz1> commit
zonecfg:kz1> exit
root@global:~ # zoneadm -z kz1 apply
zone 'kz1': Checking: Removing device storage=lu:luname.naa.6006016027802e00084ff53eefdae511
zone 'kz1': Checking: Removing device storage=lu:luname.naa.6006016027802e00965dc37eefdae511
zone 'kz1': Applying the changes

And we're done.

Links

Thursday, November 16, 2017

Veritas InfoScale 7.3.1 IPS repo

Veritas InfoScale 7.3.1 IPS repo

Let's create a Veritas InfoScale 7.3.1 IPS repo today. Log in into the VERITAS Entitlement Management System to download Veritas_InfoScale_7.3.1_Solaris_SPARC.tar.gz. We just need one file from the archive to proceed.

$ gzcat Veritas_InfoScale_7.3.1_Solaris_SPARC.tar.gz | tar xf - ./dvd1-sol_sparc/sol11_sparc/pkgs/VRTSpkgs.p5p

Good, let's create the IPS repo now.

# zfs create install/pkgrepo/vrts_sparc
# pkgrepo create /install/pkgrepo/vrts_sparc
# pkgrepo add-publisher -s /install/pkgrepo/vrts_sparc Veritas
# pkgrecv -s VRTSpkgs.p5p -d /install/pkgrepo/vrts_sparc '*'
Processing packages for publisher Veritas ...
Retrieving and evaluating 27 package(s)...
PROCESS                                         ITEMS    GET (MB)   SEND (MB)
Completed                                       27/27 488.4/488.4 465.7/465.7

# pkgrepo -s /install/pkgrepo/vrts_sparc list VRTSvxvm
PUBLISHER NAME                                          O VERSION
Veritas   VRTSvxvm                                        7.3.1.0,5.11:20171013T065743Z
# svccfg -s pkg/server add vrts_sparc
# svccfg -s pkg/server:vrts_sparc
svc:/application/pkg/server:vrts_sparc> setprop pkg/inst_root = /install/pkgrepo/vrts_sparc
svc:/application/pkg/server:vrts_sparc> setprop pkg/standalone = boolean: false
svc:/application/pkg/server:vrts_sparc> setprop pkg/readonly = boolean: true
svc:/application/pkg/server:vrts_sparc> refresh
svc:/application/pkg/server:vrts_sparc> ^D
# svcadm enable -s svc:/application/pkg/server:vrts_sparc
# svcadm restart svc:/application/pkg/depot:default

Don't forget to check for updates and/or a newer ASL on https://sort.veritas.com/patch/finder and https://sort.veritas.com/asl as well.

Links

Thursday, September 28, 2017

Using Jenkins to build nginx

Using Jenkins to build nginx

Last time we installed and configured Jenkins (see Leeeroooy Jenkins or let's do some CI/CD). Let's build nginx with Jenkins today.

We want everything in Git for this. This means we have to install Git and the Git Jenkins plugin (internal network here, that's why the wget calls instead of the built-in Jekins plugin manager).

# pkg install --no-backup-be git
           Packages to install:  1
            Services to change:  1
...

# su - jenkins
$ cd /tank/jenkins/plugins
$ wget https://updates.jenkins-ci.org/latest/git.hpi \
       https://updates.jenkins-ci.org/latest/scm-api.hpi \
       https://updates.jenkins-ci.org/latest/workflow-scm-step.hpi \
       https://updates.jenkins-ci.org/latest/workflow-step-api.hpi \
       https://updates.jenkins-ci.org/latest/mailer.hpi \
       https://updates.jenkins-ci.org/latest/display-url-api.hpi \
       https://updates.jenkins-ci.org/latest/matrix-project.hpi \
       https://updates.jenkins-ci.org/latest/junit.hpi \
       https://updates.jenkins-ci.org/latest/script-security.hpi \
       https://updates.jenkins-ci.org/latest/credentials.hpi \
       https://updates.jenkins-ci.org/latest/git-client.hpi \
       https://updates.jenkins-ci.org/latest/ssh-credentials.hpi \
       https://updates.jenkins-ci.org/latest/structs.hpi
...
$ chown jenkins:jenkins *.hpi

# svcadm restart tomcat8

There should be a Git plugin an the Jenkins website when you click on "Manage Jenkins" -> "Manage Plugins" -> "Installed"

There is? Good, time to switch to a personal user to create our first Git repo (or use an existing one).

$ git init
Initialized empty Git repository in /home/sparcy/jenkins/.git/
$ git config --global user.email "sparcy@jenkins.mycompany.com"
$ git config --global user.name "SPARCy"

And populate it with the bits we need to compile nginx. See How to build software on Solaris 11/SPARC for an explanation where the compiler flags are taken from. Some background on building nginx can be found at nginx on Solaris 11.3 SRU 19 with EC crypto and HTTP/2 support as well.

$ cat << EOF > compiler.sh
export SHELL='/bin/bash'
export NM='/usr/gnu/bin/nm'
export MAKE='/usr/bin/gmake'
export PATH="$(getconf PATH):/opt/solarisstudio12.6/bin"

CPP_LF64="$(getconf LFS64_CFLAGS)"
CPP_XPG6MODE='-D_XOPEN_SOURCE=600 -D__EXTENSIONS__=1 -D_XPG6'
export CPPFLAGS="$CPP_LF64 $CPP_XPG6MODE"

studio_XBITS='-xarch=sparcvis2'
studio_C99_ENABLE='-xc99=all'
studio_FEATURES_EXTENSIONS='-features=extensions'
studio_OPT='-xO4'
studio_PIC='-KPIC -DPIC'
studio_IROPTS='-W2,-xwrap_int'
studio_XREGS='-Qoption cg -xregs=no%appl'
studio_ALIGN='-xmemalign=16s'
studio_MT='-mt'

export CC='/opt/developerstudio12.6/bin/cc'
export CFLAGS="-m64 $studio_OPT $studio_XBITS $studio_XREGS $studio_IROPTS $studio_C99_ENABLE $studio_MT $studio_PIC $studio_ALIGN"

studio_NORUNPATH='-norunpath'
studio_CXXLIB_CSTD='-library=Cstd,Crun'

export CXX='/opt/developerstudio12.6/bin/CC'
export CXXFLAGS="-m64 $studio_OPT $studio_XBITS $studio_XREGS $studio_IROPTS $studio_PIC $studio_NORUNPATH $studio_CXXLIB_CSTD $studio_ALIGN"

LD_Z_IGNORE='-zignore'
LD_Z_STRIP_CLASS='-zstrip-class=comment'
LD_B_DIRECT='-Bdirect'
LD_Z_PIE_ENABLE='-ztype=pie'
ASLR_ENABLE='-zaslr=enable'
NXSTACK_ENABLE='-znxstack=enable'
NXHEAP_ENABLE='-znxheap=enable'
LD_MAP_NOEXBSS='-M /usr/lib/ld/map.noexbss'
LD_MAP_PAGEALIGN='-M /usr/lib/ld/map.pagealign'

export LDFLAGS="-m64 $LD_MAP_NOEXBSS $LD_MAP_PAGEALIGN $LD_B_DIRECT $LD_Z_IGNORE $LD_Z_STRIP_CLASS $ASLR_ENABLE $NXSTACK_ENABLE $NXHEAP_ENABLE $LD_Z_PIE_ENABLE"

export PKG_CONFIG_PATH="/usr/lib/64/pkgconfig"

# also change package.sh when changing DESTDIR
export DESTDIR="$WORKSPACE/$JOB_NAME/proto"
EOF

$ mkdir nginx
$ cd nginx
$ cat << EOF > build.sh
#!/bin/bash

set -ex

. $WORKSPACE/compiler.sh

VER="1.13.5"
rm -rf nginx-$VER
wget https://mirror.mycompany.com/distfiles/nginx-${VER}.tar.gz
gzcat nginx-${VER}.tar.gz | pax -r
cd nginx-$VER
#gpatch -p1 < $WORKSPACE/$JOB_NAME/nginx.patch

./configure --prefix=/opt/nginx --user=webservd --group=webservd \
    --with-cc-opt="$CPPFLAGS $CFLAGS" --with-ld-opt="$LDFLAGS" \
    --with-cpu-opt=sparc64 --with-threads --with-http_ssl_module \
    --with-http_v2_module --pid-path=/var/run/nginx.pid
perl -w -pi -e 's/-fast -xipo //; s/-g //' objs/Makefile
$MAKE build

# Install

rm -rf $DESTDIR
$MAKE DESTDIR=$DESTDIR install

rmdir $DESTDIR/var/run $DESTDIR/var

mkdir -p $DESTDIR/lib/svc/manifest/site $DESTDIR/etc/logadm.d

#/usr/sbin/svccfg validate $WORKSPACE/$JOB_NAME/nginx.xml
#cp $WORKSPACE/$JOB_NAME/nginx.xml $DESTDIR/lib/svc/manifest/site/

#cp $WORKSPACE/$JOB_NAME/nginx.conf $DESTDIR/opt/nginx/conf/
openssl dhparam -engine pkcs11 -out $DESTDIR/opt/nginx/conf/dhparam.pem 2048

#cp $WORKSPACE/$JOB_NAME/nginx.logadm.conf $DESTDIR/etc/logadm.d/
EOF

$ chmod +x build.sh
$ cd ..
$ git add compiler.sh nginx
$ git commit -m "Initial nginx import"

The next steps assume we have the Developer Studio compiler installed, again see How to build software on Solaris 11/SPARC on how to get it. We need some tools like GNU make and binutils, too.

# pkg install --no-backup-be developer/build/gnu-make developer/gnu-binutils
           Packages to install:  2
            Services to change:  1
...

Time to create our first item in Jenkins now. We use nginx for Enter an item name and make it a Freestyle project.

Jenkins System Properties

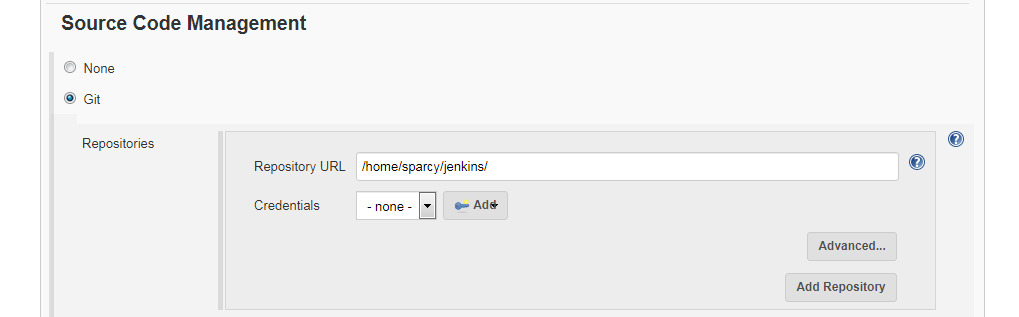
Select Git as Source Code Management and insert the path to the git repo you initialized above.

Jenkins System Properties

In Build, select Execute Shell and make it execute the following two lines.

cd $WORKSPACE/nginx
./build.sh
Jenkins System Properties

Click Build Now and Jenkins will start building nginx for us.

Links

Wednesday, September 20, 2017

Leeeroooy Jenkins or let's do some CI/CD

Leeeroooy Jenkins or let's do some CI/CD

Let's have some fun with Jenkins today. I could run the war file right ahead, but I don't want to write a SMF service to start/stop it. So let's go with Tomcat instead.

# pkg install --no-backup-be tomcat-8

# zfs create -o compression=lz4 tank/tomcat8
# rsync -av /var/tomcat8/ /tank/tomcat8/
# rm -rf /tank/tomcat8/webapps/ROOT

# cat << EOF > /usr/tomcat8/bin/setenv.sh
UMASK="0022"
CATALINA_BASE="/tank/tomcat8"
CATALINA_OPTS="-DJENKINS_HOME=/tank/jenkins/ -Dhudson.model.UpdateCenter.never=true -Dhudson.DNSMultiCast.disabled=true -Dhudson.udp=-1"
JAVA_OPTS="-Xms256m -Xmx1g -XX:+UseLargePages"
EOF

Let's fix those nasty consider increasing the maximum size of the cache warnings, too.

# tail -f /tank/tomcat8/logs/catalina.out
19-Sep-2017 12:52:48.777 WARNING [Handling GET /static/30e0a8de/assets/jquery-detached/jsmodules/jquery2.js from 127.0.0.1 : http-nio-127.0.0.1-8080-exec-1] org.apache.catalina.webresources.Cache.getResource Unable to add the resource at [/WEB-INF/classes/assets/jquery-detached/jsmodules/jquery2.js] to the cache for web application [] because there was insufficient free space available after evicting expired cache entries - consider increasing the maximum size of the cache
...

# perl -w -pi  -e 's|^(</Context>)$|    <Resources cachingAllowed="true" cacheMaxSize="100000" />\n$1|' /tank/tomcat8/conf/context.xml

We want Tomcat to listen on localhost only because we'll proxy it later through an TLS Apache httpd (you know, compliance...). Also make sure to change XXX_REPLACE_WITH_YOUR_FQDN to the FQDN you're using.

# groupadd -g 5213 jenkins
# useradd -u 5213 -g jenkins -d /tank/jenkins -s /bin/ksh93 -m jenkins
# passwd -N jenkins

# zfs create -o compression=lz4 tank/jenkins
# chown jenkins:jenkins /tank/jenkins

# wget -O /tank/tomcat8/webapps/ROOT.war http://mirrors.jenkins.io/war-stable/latest/jenkins.war
# chown jenkins:jenkins /tank/tomcat8/webapps/ROOT.war

# perl -w -pi -e 's|(<Connector port="8080" protocol="HTTP/1.1")|$1 address="127.0.0.1" proxyName="XXX_REPLACE_WITH_YOUR_FQDN" proxyPort="443"|' /tank/tomcat8/conf/server.xml
# perl -w -pi -e 's|^(\s+<Connector port="8009" protocol="AJP/1.3" redirectPort="8443" />)$|<!-- $1 -->|' /tank/tomcat8/conf/server.xml

# svccfg -s tomcat8 setprop start/user=jenkins
# svccfg -s tomcat8 setprop start/group=jenkins
# svcadm refresh tomcat8
# svcadm enable tomcat8
# tail -f /tank/tomcat8/logs/catalina.out
...
19-Sep-2017 12:58:45.093 INFO [Jenkins initialization thread] hudson.WebAppMain$3.run Jenkins is fully up and running

Tomcat is running as a non-root user and serving Jenkins on localhost now. Time to configure the Apache httpd proxy.

Steps for creating a new SSL certificate/key with pktool can be found here How to create a SSL CA/certificate/key with pktool. Done? Good.

# cp CA.crt /etc/apache2/2.2/server-ca.crt
# cp server.crt /etc/apache2/2.2/
# cp server.key /etc/apache2/2.2/
# chown webservd:webservd /etc/apache2/2.2/server*

# cat << 'EOF' > /etc/apache2/2.2/conf.d/ssl-jenkins.conf
SSLRandomSeed startup file:/dev/urandom 512
SSLRandomSeed connect file:/dev/urandom 512

SSLCryptoDevice pkcs11

Listen XXX_REPLACE_WITH_YOUR_FQDN:443

AddType application/x-x509-ca-cert .crt
AddType application/x-pkcs7-crl    .crl

SSLCipherSuite AESGCM:AES
SSLProxyCipherSuite AESGCM:AES
SSLHonorCipherOrder on
SSLProtocol TLSv1.2
SSLProxyProtocol TLSv1.2
SSLSessionCache "shmcb:/var/run/apache2/2.2/ssl_scache(512000)"
SSLSessionCacheTimeout 300
SSLMutex "file:/var/run/apache2/2.2/ssl_mutex"

ProxyRequests off
ProxyPreserveHost on

<VirtualHost _default_:443>
  ServerName XXX_REPLACE_WITH_YOUR_FQDN
  ServerAdmin webservd@XXX_REPLACE_WITH_YOUR_FQDN

  SSLEngine on
  SSLCompression off
  SSLSessionTickets off
  SSLCertificateFile "/etc/apache2/2.2/server.crt"
  SSLCertificateKeyFile "/etc/apache2/2.2/server.key"
  SSLCertificateChainFile "/etc/apache2/2.2/server-ca.crt"

  Header always set Strict-Transport-Security "max-age=15768000"

  RequestHeader set X-Forwarded-Proto "https"
  RequestHeader set X-Forwarded-Port "443"
  AllowEncodedSlashes NoDecode

  ProxyPass / http://127.0.0.1:8080/ nocanon
  ProxyPassReverse / https://XXX_REPLACE_WITH_YOUR_FQDN/

  CustomLog "/var/apache2/2.2/logs/ssl_request_log" \
          "%t %h %{SSL_PROTOCOL}x %{SSL_CIPHER}x \"%r\" %b"
</VirtualHost>
EOF

# /usr/apache2/2.2/bin/apachectl -t
Syntax OK

# svcadm enable apache22

Fetch the admin password from /tank/jenkins/secrets/initialAdminPassword and you're ready to go.

Jenkins System Properties

Read the next part at Using Jenkins to build nginx.

Links

Thursday, September 14, 2017

When fstrim trims all our SAN paths on SLES12

When fstrim trims all our SAN paths on SLES12

Let's venture into Linux land today. We had several unplanned outages the last weeks and it all boiled down to... fstrim(8)

Sep 11 00:04:40 sles12db multipathd[2086]: sdai: mark as failed
Sep 11 00:04:40 sles12db multipathd[2086]: mpath-lvm--002: remaining active paths: 3
Sep 11 00:04:40 sles12db kernel: [...] sd 0:0:3:0: [sdai] tag#0 FAILED Result: hostbyte=DID_OK driverbyte=DRIVER_SENSE
Sep 11 00:04:40 sles12db kernel: [...] sd 0:0:3:0: [sdai] tag#0 Sense Key : Illegal Request [current]
Sep 11 00:04:40 sles12db kernel: [...] sd 0:0:3:0: [sdai] tag#0 ASC=0x27 <<vendor>>ASCQ=0xb0
Sep 11 00:04:40 sles12db kernel: [...] sd 0:0:3:0: [sdai] tag#0 CDB: Write same(16) 93 08 00 00 00 00 05 04 08 00 00 00 10 a8 00 00
Sep 11 00:04:40 sles12db kernel: [...] blk_update_request: 38 callbacks suppressed
Sep 11 00:04:40 sles12db kernel: [...] blk_update_request: I/O error, dev sdai, sector 84150272
Sep 11 00:04:40 sles12db kernel: [...] EXT4-fs (dm-17): discard request in group:321 block:0 count:533 failed with -5
...
Sep 11 00:04:41 sles12db multipathd[2086]: sdaf: mark as failed
Sep 11 00:04:41 sles12db multipathd[2086]: mpath-lvm--002: remaining active paths: 2
Sep 11 00:04:41 sles12db multipathd[2086]: sdz: mark as failed
Sep 11 00:04:41 sles12db multipathd[2086]: mpath-lvm--002: remaining active paths: 1
Sep 11 00:04:41 sles12db multipathd[2086]: sdac: mark as failed
Sep 11 00:04:41 sles12db multipathd[2086]: mpath-lvm--002: remaining active paths: 0

Ooops. There goes our Oracle database filesystem...

We came to the conclusion that HBA, cables, Fibre Channel switch and storage system are fine because it only affected 3 LUNs out of 7 and everything was back to normal after 4 seconds. The following message was suspicious though.

Sep 11 00:04:40 sles12db fstrim[138568]: fstrim: /oracle/SID/oraarch: FITRIM ioctl failed: Input/output error

And guess what...

# systemctl list-timers
NEXT LEFT LAST PASSED UNIT
...
Mon 2017-09-18 00:00:00 CEST 5 days left Mon 2017-09-11 00:00:00 CEST 1 day 8h ago fstrim.timer

Luckily we were able to reproduce this on a test server using filebench rather quickly.

#  grep -Hv "zz" /sys/block/sdai/queue/discard_max_bytes
/sys/block/sdai/queue/discard_max_bytes:8183808

# mount -v
...
/dev/mapper/testvg-oraarch on /mnt/oraarch type ext4 (rw,relatime,discard,nobarrier,data=ordered)

# cat fileserver.f
set $dir=/mnt/oraarch
set $nfiles=10000
set $meandirwidth=40
set $filesize=cvar(type=cvar-gamma,parameters=mean:16m;gamma:1.5)
set $nthreads=50
set $iosize=1m
set $meanappendsize=16k
set $runtime=600

define fileset name=bigfileset,path=$dir,size=$filesize,entries=$nfiles,dirwidth=$meandirwidth,prealloc=80

define process name=filereader,instances=1
{
  thread name=filereaderthread,memsize=10m,instances=$nthreads
  {
    flowop createfile name=createfile1,filesetname=bigfileset,fd=1
    flowop writewholefile name=wrtfile1,srcfd=1,fd=1,iosize=$iosize
    flowop closefile name=closefile1,fd=1
    flowop openfile name=openfile1,filesetname=bigfileset,fd=1
    flowop appendfilerand name=appendfilerand1,iosize=$meanappendsize,fd=1
    flowop closefile name=closefile2,fd=1
    flowop openfile name=openfile2,filesetname=bigfileset,fd=1
    flowop readwholefile name=readfile1,fd=1,iosize=$iosize
    flowop closefile name=closefile3,fd=1
    flowop deletefile name=deletefile1,filesetname=bigfileset
    flowop statfile name=statfile1,filesetname=bigfileset
  }
}

echo  "File-server Version 3.0 personality successfully loaded"

run $runtime
# ./bin/filebench -f fileserver.f
...
160.033: Failed to open file 9103, /mnt/oraarch/bigfileset/00000001/00000004/00000002/00000001/00000065/00000056/00000023/00000018, with status 10: Read-only file system
160.033: filereaderthread-39: flowop createfile1-1 failed
160.033: failed to create file createfile1
160.034: filereaderthread-1: flowop createfile1-1 failed
160.034: failed to create file createfile1
160.034: filereaderthread-35: flowop createfile1-1 failed
160.033: failed to create file createfile1
160.034: filereaderthread-44: flowop createfile1-1 failed
160.193: Run took 159 seconds...

# mount -v
...
/dev/mapper/testvg-oraarch on /mnt/oraarch type ext4 (ro,relatime,discard,nobarrier,data=ordered)

Software affected so far: SuSE SLES 12 SP2, kernel-default-4.4.59-92.24.2.x86_64, Fujitsu Eternus DX8700 S3 with thin provisioned storage.

Update 2017-11-06 -- And here is the official SuSE KB document Read-only or corrupted filesystem after fstrim operation on Eternus DXM provided storage LUN.

Links

389 Directory Server 1.3.x LDAP client authentication

389 Directory Server 1.3.x LDAP client authentication Last time we did a multi-master replication setup, see 389 Directory Server 1.3.x Repl...